NXP TagWriter is a general NFC reader/writer application that is highly recommended and available on Google Play App store. It only has a few main features such as reading, writing, erasing, and protecting tags which makes it easy-to-use and understand even for first-time NFC users. An interesting feature on this app is the amount of options it gives you when writing a tag.
Below are all the abilities/formats available for writing to a tag:
Business Card
Link/URL
Wi-Fi
Bluetooth
Telephone Number
Geo Location
Launch an Application
Plain Text
SMS
This tutorial will show how easy using NFC technology can be. For this tutorial, you will need:
Smartphone with NFC enabled
NXP TagWriter (Free download on one of the Google Play App Store)
NFC Tag (Open, not a locked or secured tag)
Because one of the most common uses for NFC tags is to launch websites, we are going to write a Link/URL to the tag so that, when someone taps the tag with their NFC enabled smartphone/device, the phone pulls up the intended URL.
1. Open the NXP TagWriter App and tap “Write Tag”.
2. The menu will display the following options:
New dataset
My datasets
Write from CSV
Copy tag
Copy QR Code
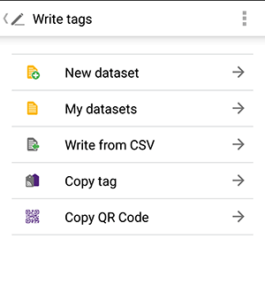
3. Tap “New dataset”.
4. Because we are going to write a URL/Link, tap “Link”.
5. If you want to add a title for your link in the “Description” field you can; if not, leave it blank.
6. The “URL Type” should read “URL Website”.
7. Below the field “URL Website”, type in the intended URL in the field that reads “Enter Website”. NOTE: the website you enter must begin with “https://” in order to work properly.
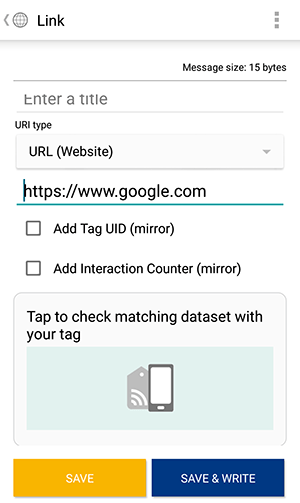
8. The box below, “Add Tag UID (mirror)”, is a function that adds the tag’s Unique Identifier at the end of the URL to let you know how many people used that NFC tag to go to your website. This is a great function if you have multiple tags with the same URL and want to know which ones perform better than others. If you do not want this tracking ability, simply leave that box blank.
9. The box below, “Add Interaction Counter (mirror)”, is a function that adds an incrementing number to the end of the URL each time someone interacts with that tag. For example, if Person A interacts with the tag first the URL would add a “1” on the end; later, when Person B interacts with the tag, the URL will add a “2” on the end, and so on.
10. Next, tap “Save & Write”.
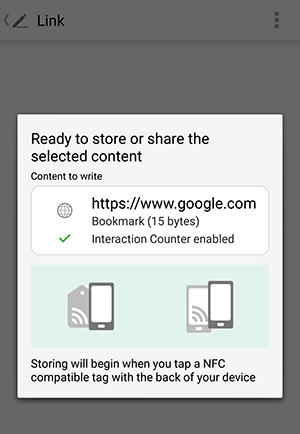
11. The next screen will feature your Content at the top, followed by options which are laid out and explained below.
Write multiple NFC tags (one by one) – check this box if you wish to write the same content to multiple tags one after another.
Protection – Check this box if you want your NFC tag to be protected. If you check this box a few options of varying levels of protection pop up:
Soft Protection – disables the tag from being over-written by another user; this tag can be re-written by using your erase function.
Password Protection – your tag will be read-only and could only be re-written with a password that you create. When this option is chosen, another screen will pop-up prompting you to create a password.
Lock Tag – this option makes the tag read-only and it can never be re-written. If you chose this option, triple-check your content before you write the tag.
Confirm Overwrite – this box should be selected each time you write a tag so the tag knows to delete the previous data and write the new data.
Enable Interaction Counter – you must click this box IF you added Interaction Counter (mirror) on the previous screen. This just enables the interaction counter to work.
12. When you have checked the boxes you would like for your tag, tap “Write”.
13. Then, a pop-up displays on the screen that reads “Ready to store or share the selected content”. At this point, hold the NFC tag up and tag it to the back of the smartphone.
TIP: Hold the tag up to the phone, touching the back for 2-5 seconds in the same place to ensure it reads.
TIP: You might have to find the “sweet spot” on the phone depending on the type of phone and tag, if you do not see a new screen in 2-5 seconds, move the tag to another place on the phone tag and hold another 2-5 seconds. By moving it and then holding it in place, you will locate the best spot for writing tags with that phone’s NFC reader and tag type.
14. When the tag is pressed to the back of the phone, another screen will appear that reads “Confirm Overwrite”, with a button at the bottom reading “Tap to Confirm Store”. Tap that button while holding the NFC tag against the back of the phone.
15. After a few seconds, a confirmation screen will appear that reads “Write Successful”, which means you have written data successfully the to the tag.
If you would like to read the tag to ensure the write was successful, tab back to the home screen and tap “Read tags”, hold the tag up to the back of the reader and make sure that you see your content on the “Content section”.